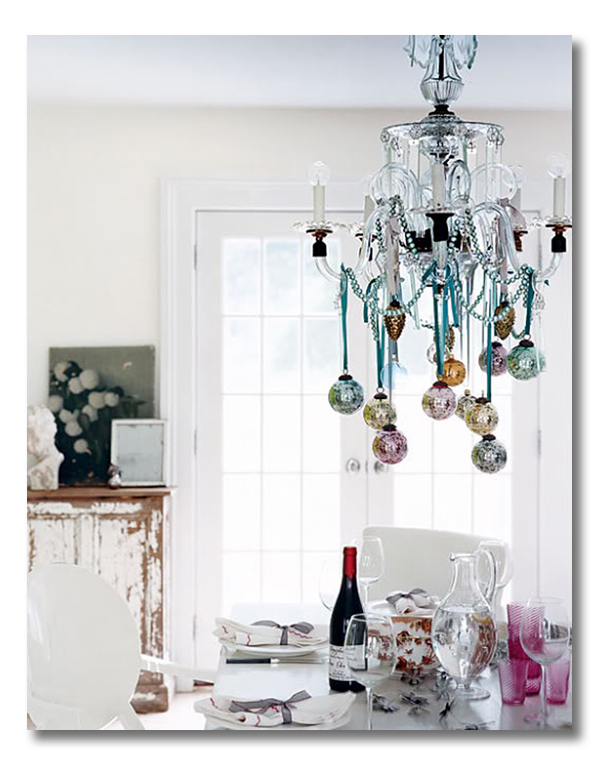
Today’s ditto is a fun ditto diy of a Christmas Chandelier!
But before I dive in, I really want to thank you all for your comments on last Monday’s post. I wish I could sit down and respond to each and every one, because you have all touched my heart and encouraged me so much. Thank you from the bottom of my heart! Life surely is amazing, right? We never know what adventure is around the next corner.
///
Now. Time to get festive.
and…. you all know that my philosophy on DIY’s is:
“You better be glam.
You better not make me cry.
You better end up looking like a million bucks, I’m tellin you why”:
because otherwise, I am NOT in the LEAST interested in DIY-ing. The end.
So, I love that today’s ditto diy of a Christmas Chandelier is basically self explanatory via the photo itself:
{image via domino}
Gorgeous, right?
Basically: add ribbon, ball ornaments, and beaded garland to your chandelier! Voila. A party chandelier that is nothing short of glam.
Tips?
1. Use satin ribbon. It will reflect the light and look so richly gorgeous.
2. Stay with a narrow color scheme so that the light does not look too busy.
3. To keep the look as sophisticated as in the photo above, steer clear of plastic ornaments or beads.
4. Safety first, of course. Don’t wrap anything around or near the bulbs. But you all are smarty-pants … It was so unnecessary for me to type that, right?
5. Try glass ornaments and glass beads for the ultimate in holiday shimmer.
Details make the difference!
A fun ditto diy, no?
SO, Who’s gonna try it?? What colors are you going to use??
What else have you added to your Christmas Chandelier in years past?
* * * * *
Just two weeks until Christmas! Check out our family Christmas cards here, and place your Minted.com order in time for Christmas! See site for great discount codes.

* * *
In December, there are serious perks over at Stella & Dot! For every $50 you spend you will earn $25 in Dot Dollars to redeem for yourself in the new year.

Don’t miss a single post from Fieldstone Hill Design! Have regular decorating goodness delivered {free!} directly to your inbox.
{This post contains affiliate links. Thanks for reading and supporting FHD! You are the best!}


Ha! The past few years we just hoped our lightbulbs wouldn’t explode on us! 🙂 That’s a pretty fixture…our chandelier is centered in the room, but if the table were also centered one could not sit down, so I feel like if I decorated the light fixture I’d draw more attention to the fact that I have moved the table out.
Do you know the trick of putting a ceiling hook up, centered over the table, and then swagging the cord from where the light is hardwired, over to the hook. Then the chandy can be centered.
One hook. 10 minutes. voila! A centered chandelier!
Love this look – gorgeous may be an understatement. It’s taking everything in my power to keep my feet on the ground and finish my coffee and this post. I have a new box of mirrored disco glass ornaments on the table waiting for just this moment… I’ll be transforming my chandelier before I finish the morning dishes, that way I can enjoy the reflection in the sink window. HAPPY DECORATING!
ooh! post the pic on facebook and send it my way! https://www.facebook.com/fieldstonehilldesign
I love your DIY philosophy. LOL! This chandelier is very pretty! We have a builder-grade chandelier in our eating area; to make it more festive this year, I added bunches of snowflake ornaments on hooks. Very, very simple. P.S. I was so excited to see the article featuring you in BHG!!! Congrats!
aw! thanks carrie!! and I giggled knowing I am not the only one who appreciates this diy philosophy! ha!
fhd press:
FHD’s popular posts
sponsors I love
peruse
shop like it’s your job
FHD in blogland
categories
31 Days of Favorite Spaces A room I love about me Affordable Designer Rooms beautiful colors beautiful thoughts Bebe bebe bebe nursery before and after BHG blogland built-in of the Week client spaces contrast decorating yourself defining your style design boards design in progress design question ditto ditto d.i.y. ditto-worthy designers en masse farmhouse simplicity five faves for a song from my files here at Fieldstone Hill hiding the uglies high-gloss glamour Home tour Images Of inspiration Inspired to lessons in design living with beauty Living with Beauty: Beauty Tips and Tricks Living with Beauty: Wellness Living with Beauty: Whole Food Eating Living with Beauty: Within Master Designer mixed metals must have objects organizing overcome decorating paralysis project project kitchen project library project nursery punch color renovation rituals room by room sponsor style notebook traditions trends Uncategorized vision
Archives
Theme by Design by Kendall